

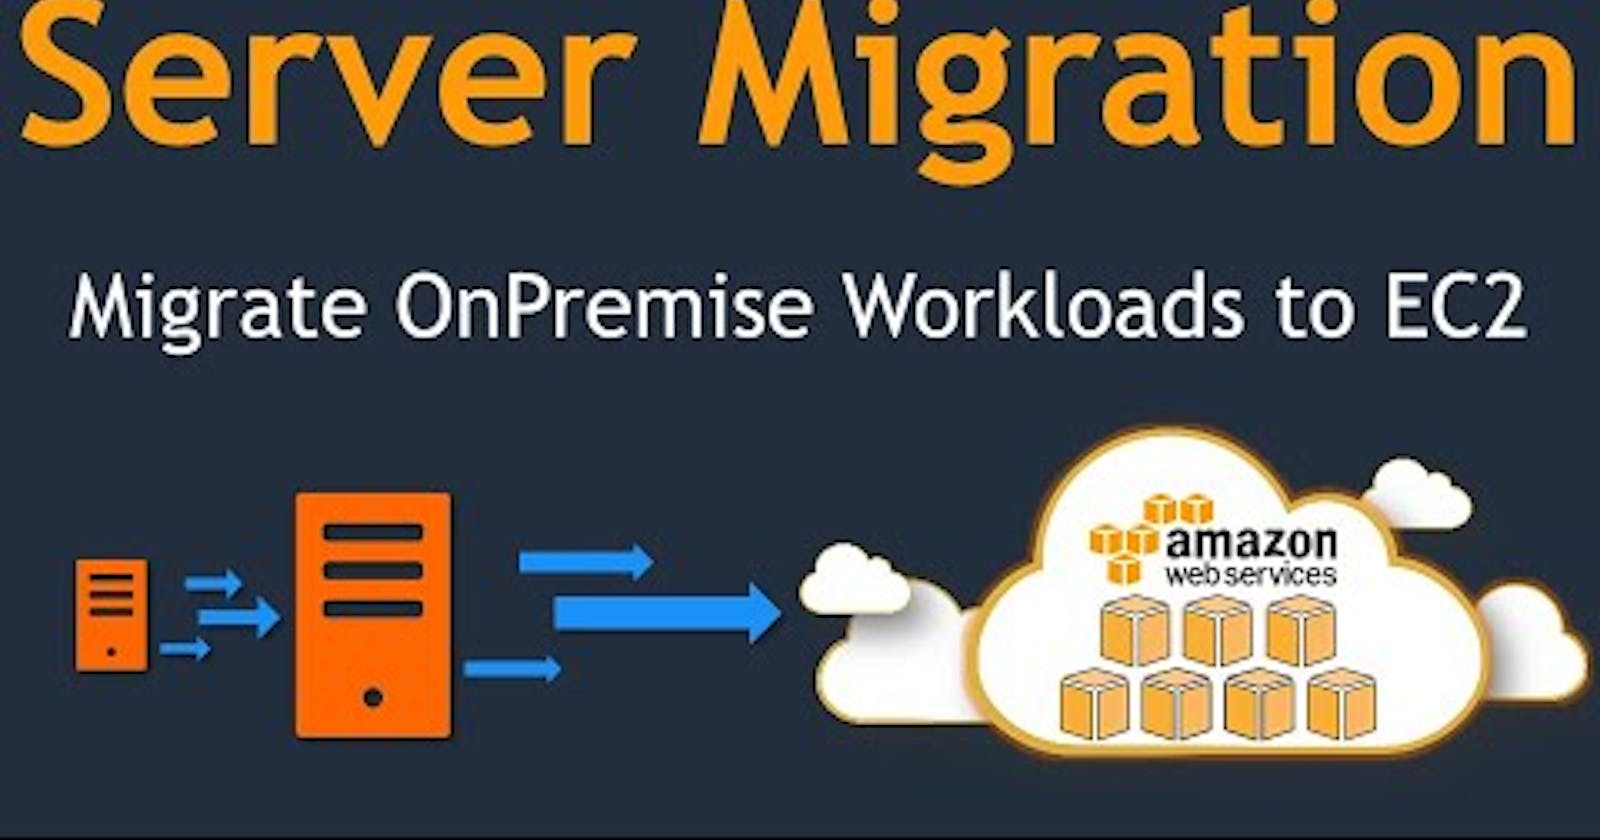
Import Your On-Premises Server and Launch as AWS EC2 Instance.
AWS VM Import Service.


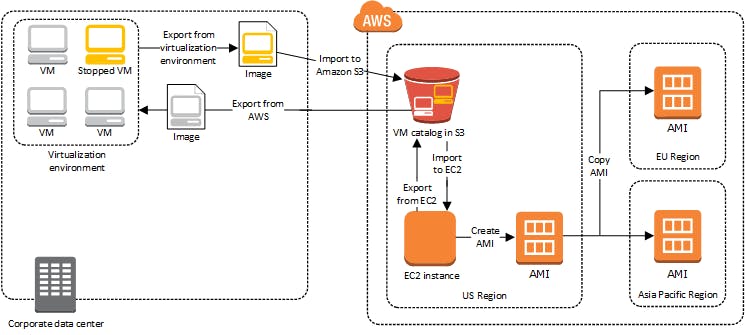
What is VM Import/Export
VM Import/Export enables you to import virtual machine (VM) images from your existing virtualization environment to Amazon EC2, and then export them back. This enables you to migrate applications and workloads to Amazon EC2, copy your VM image catalog to Amazon EC2, or create a repository of VM images for backup and disaster recovery.
- After The Modern Infrastructure all we need VM transport is must think.
AWS Offers the below services for Server Migration.
- AWS Server Migration Service
- AWS Snow Family
- AWS VM Import/Export
If our Data center or Infra is very small. We cannot use the AWS Server Migration service or Snow Family services. we have only VM Import/Export Service for that.
Here i am going to explain how to export our on-premises server to S3 Bucket and import to AWS Cloud instance .
The Plan As Diagram
Pre-resquites
1.AWS CLI Tools installed in your PC
- Install it using this coomand.
msiexec.exe /i https://awscli.amazonaws.com/AWSCLIV2.msi
2.Create the S3 Bucket
- Create S3 Bucket for store the ami .you can create the s3 bucket in AWS S3 service console page.
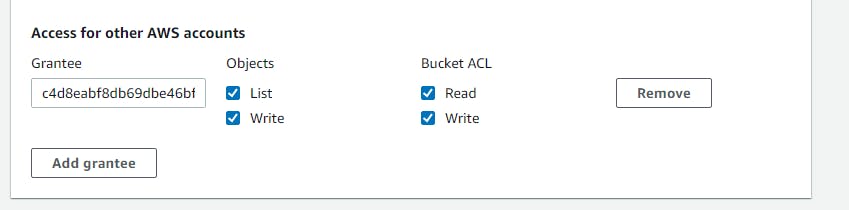
- First create the bucket and goto bucket permissions then add grantee in access control list.
- To change the Bucket ACL
- Attach an access control list (ACL) to your S3 bucket containing the following grants. For more information, see Managing Access with ACLs in the Amazon Simple Storage Service Developer Guide.
- For Grantee, provide the appropriate Region-specific canonical account ID:
Africa (Cape Town) 3f7744aeebaf91dd60ab135eb1cf908700c8d2bc9133e61261e6c582be6e33ee
Asia Pacific (Hong Kong) 97ee7ab57cc9b5034f31e107741a968e595c0d7a19ec23330eae8d045a46edfb
Asia Pacific (Osaka) 40f22ffd22d6db3b71544ed6cd00c8952d8b0a63a87d58d5b074ec60397db8c9
Europe (Milan) 04636d9a349e458b0c1cbf1421858b9788b4ec28b066148d4907bb15c52b5b9c
Middle East (Bahrain) aa763f2cf70006650562c62a09433f04353db3cba6ba6aeb3550fdc8065d3d9f
China (Beijing) and China (Ningxia) 834bafd86b15b6ca71074df0fd1f93d234b9d5e848a2cb31f880c149003ce36f
AWS GovCloud (US) af913ca13efe7a94b88392711f6cfc8aa07c9d1454d4f190a624b126733a5602
All other Regions c4d8eabf8db69dbe46bfe0e517100c554f01200b104d59cd408e777ba442a322
READ_ACP permission
WRITE permission
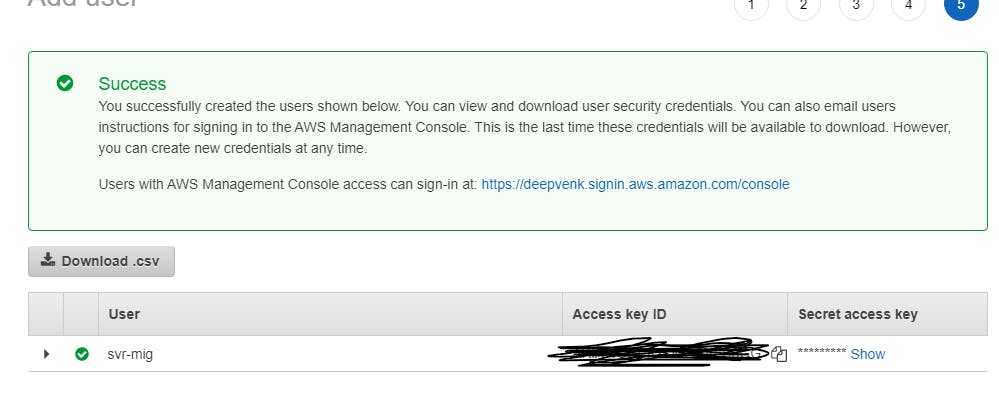
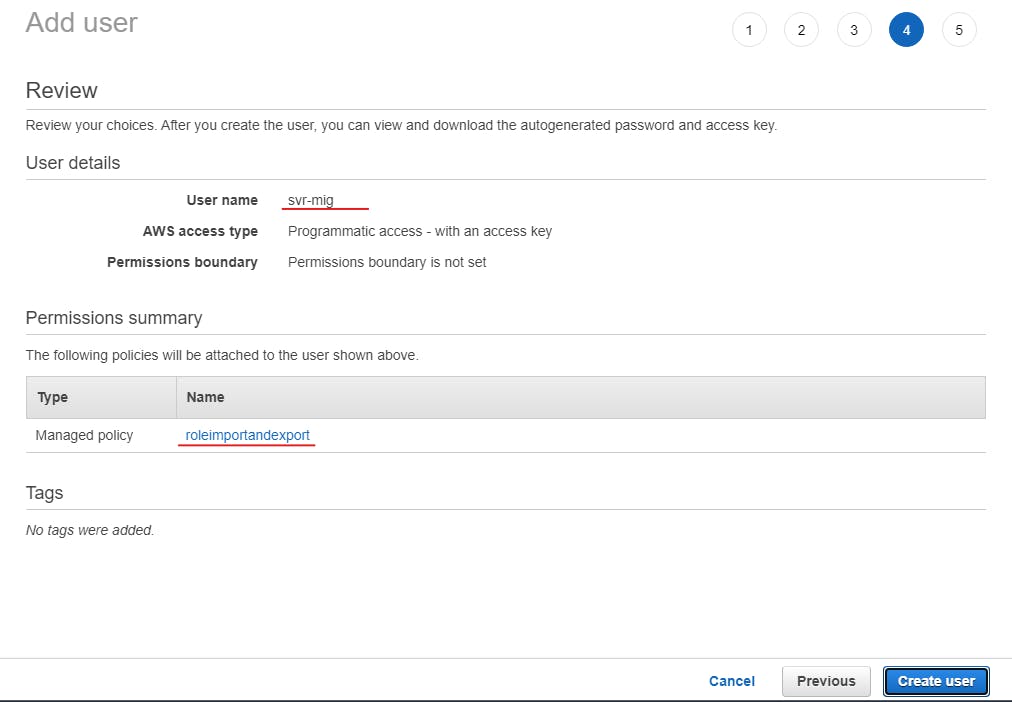
3.Create IAM User with programmatic access so that we will execute import or export task via AWS cli.
- You can create the new user in IAM console.
- While creating the user add the permission to tha IAM User. thats explained in next step.
- Dont forget to download the IAM Users Access key ID and Secret Access key .
4.IAM User Rights Role .
- First we add the below rights to our IAM User which user is configured in AWS CLI.
- The IAM User need the following permissions to do the import export task. So we will add the below rights in to the IAM policy.
- Change the s3 bucket name in the resource line. So that the policy will access the bucket.
I am adding my bucket name :shivam-import
The VM Import-Export Policy
{
  "Version": "2012-10-17",
  "Statement": [
    {
      "Effect": "Allow",
      "Action": [
        "s3:ListAllMyBuckets"
      ],
      "Resource": "*"
    },
    {
      "Effect": "Allow",
      "Action": [
        "s3:CreateBucket",
        "s3:DeleteBucket",
        "s3:DeleteObject",
        "s3:GetBucketLocation",
        "s3:GetObject",
        "s3:ListBucket",
        "s3:PutObject"
      ],
      "Resource": ["arn:aws:s3:::shivam-import","arn:aws:s3:::shivam-import/*"]
    },
    {
      "Effect": "Allow",
      "Action": [
        "ec2:CancelConversionTask",
        "ec2:CancelExportTask",
        "ec2:CreateImage",
        "ec2:CreateInstanceExportTask",
        "ec2:CreateTags",
        "ec2:DeleteTags",
        "ec2:DescribeConversionTasks",
        "ec2:DescribeExportTasks",
        "ec2:DescribeExportImageTasks",
        "ec2:DescribeImages",
        "ec2:DescribeInstanceAttribute",
        "ec2:DescribeInstanceStatus",
        "ec2:DescribeInstances",
        "ec2:DescribeSnapshots",
        "ec2:DescribeTags",
        "ec2:ExportImage",
        "ec2:ImportInstance",
        "ec2:ImportVolume",
        "ec2:StartInstances",
        "ec2:StopInstances",
        "ec2:TerminateInstances",
        "ec2:ImportImage",
        "ec2:ImportSnapshot",
        "ec2:DescribeImportImageTasks",
        "ec2:DescribeImportSnapshotTasks",
        "ec2:CancelImportTask"
      ],
      "Resource": "*"
    }
  ]
}
- I Have created the IAM User named svr-mig and add the role named roleimportandexport that contains above content.
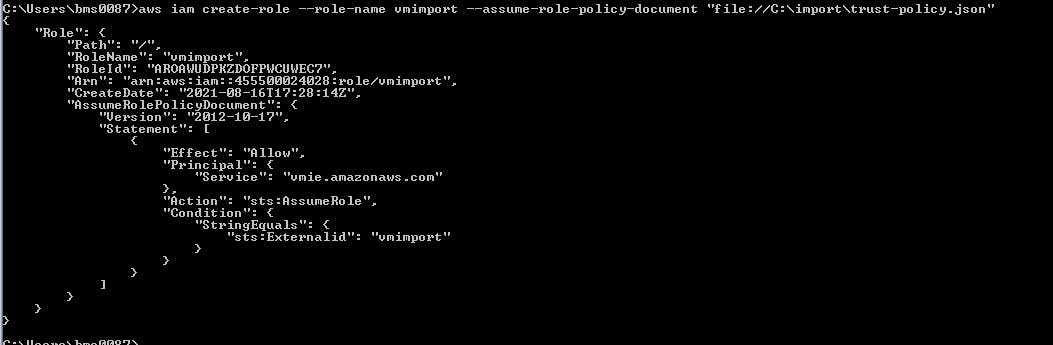
5.Create the Service role via CLI
- Use the create-role command to create a role named vmimport and grant VM Import/Export access to it.
- Ensure that you specify the full path to the location of the trust-policy.json file.
i have created in c:\import\
Add the below content in Trust policy.json file.
Trust-policy.json
{
   "Version": "2012-10-17",
   "Statement": [
      {
         "Effect": "Allow",
         "Principal": { "Service": "vmie.amazonaws.com" },
         "Action": "sts:AssumeRole",
         "Condition": {
            "StringEquals":{
               "sts:Externalid": "vmimport"
            }
         }
      }
   ]
}
The execute the below command in AWS Cli.
Include the file:// prefix as shown the following example:
aws iam create-role --role-name vmimport --assume-role-policy-document "file://C:\import\trust-policy.json"
- Also create the Role-policy.json and add the below content on it.
Role-policy.json
- Change your bucket name in resource section.
if you want do the import and export both tasks mention two bucket names.
{
   "Version":"2012-10-17",
   "Statement":[
      {
         "Effect": "Allow",
         "Action": [
            "s3:GetBucketLocation",
            "s3:GetObject",
            "s3:ListBucket"
         ],
         "Resource": [
            "arn:aws:s3:::shivam-import",
            "arn:aws:s3:::shivam-import/*"
         ]
      },
      {
         "Effect": "Allow",
         "Action": [
            "s3:GetBucketLocation",
            "s3:GetObject",
            "s3:ListBucket",
            "s3:PutObject",
            "s3:GetBucketAcl"
         ],
         "Resource": [
            "arn:aws:s3:::shivam-export",
            "arn:aws:s3:::shivam-export/*"
         ]
      },
      {
         "Effect": "Allow",
         "Action": [
            "ec2:ModifySnapshotAttribute",
            "ec2:CopySnapshot",
            "ec2:RegisterImage",
            "ec2:Describe*"
         ],
         "Resource": "*"
      }
   ]
}
- Use the following put-role-policy command to attach the policy to the role created above. Ensure that you specify the full path to the location of the role-policy.json file.
aws iam put-role-policy --role-name vmimport --policy-name vmimport --policy-document "file://C:\import\role-policy.json"

6.Prepare the VM For Export
- First we need to export our virtual machine as ova file and upload the OVA file to s3 bucket.
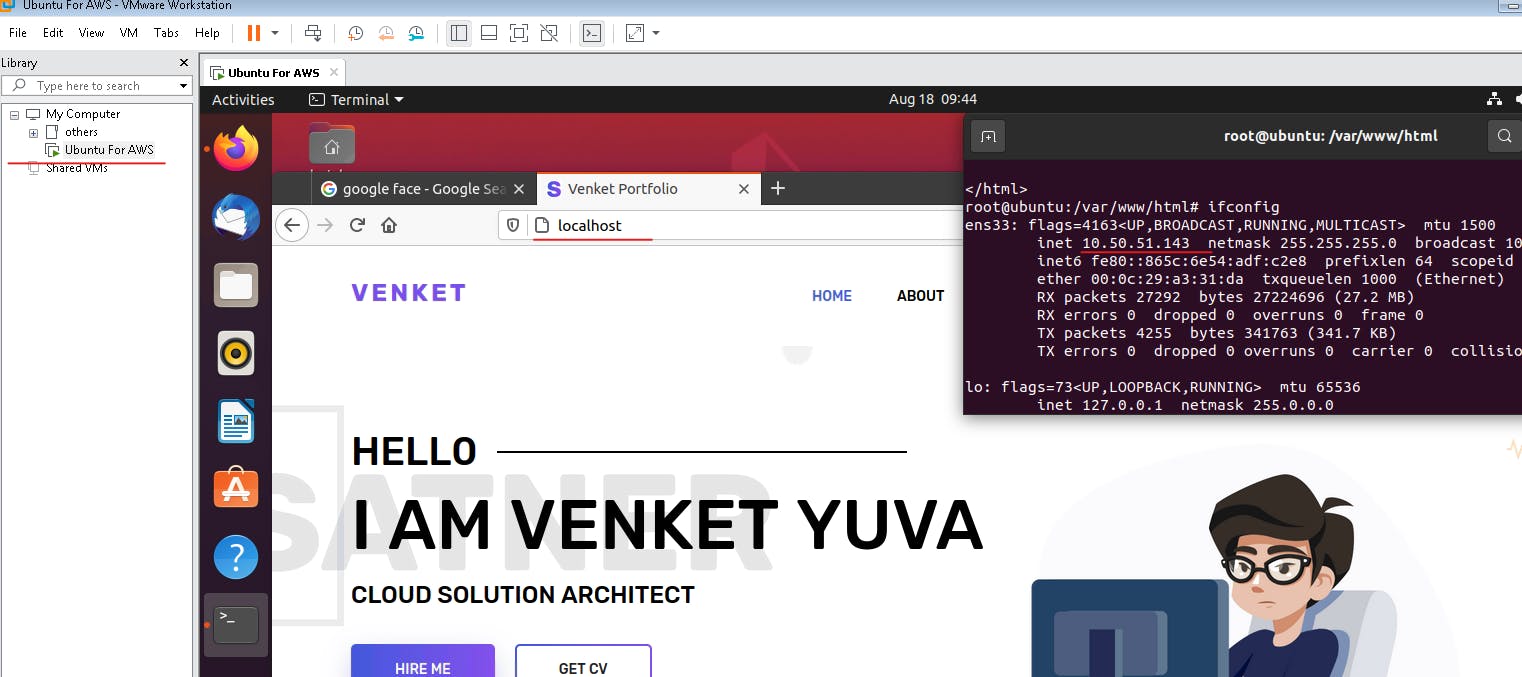
- This Ubuntu 20.04 server we will going to migrate our on prem datacenter to AWS cloud.
- This server is Nginx installed webserver.
- Power down the server and goto file menu and select export to OVF.
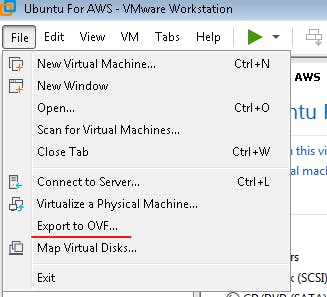
- You Must choose .ova other wise its split to 3 files.
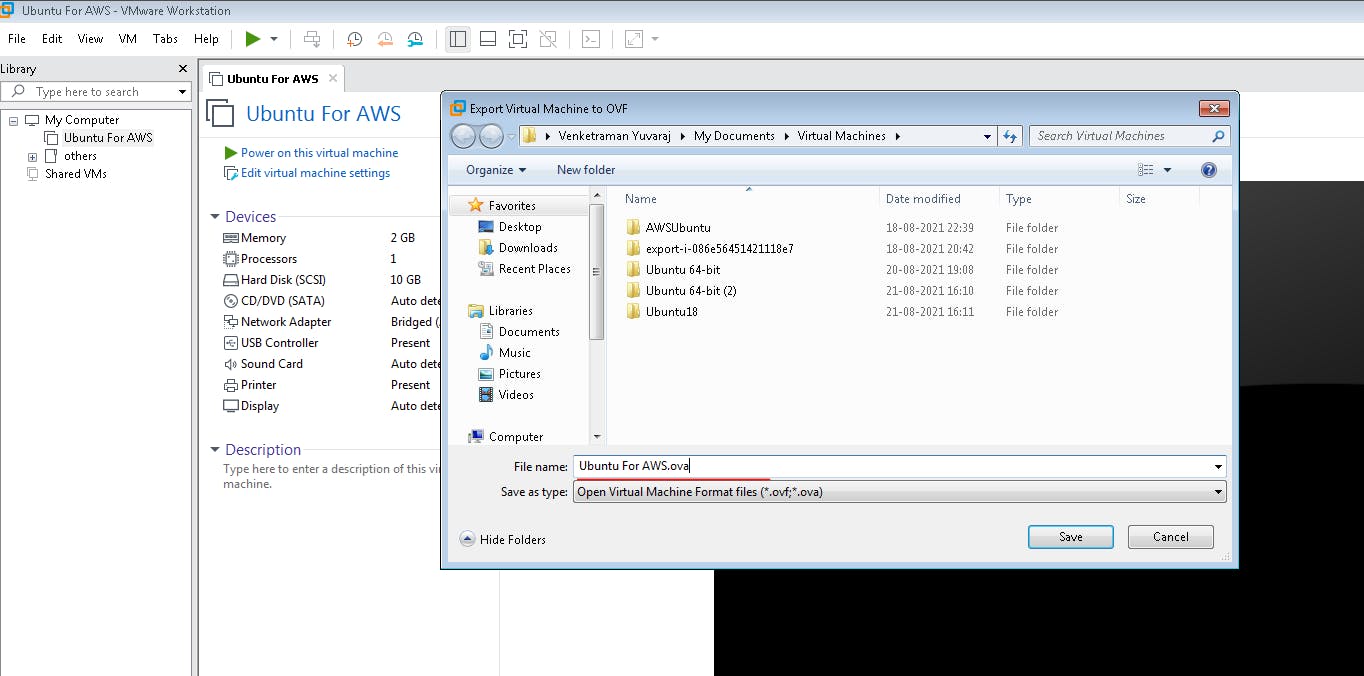
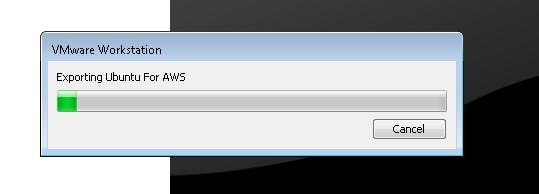
- After that Upload the exported ova to S3 Bucket.
aws s3 sync source_file locatrion s3://bucketname
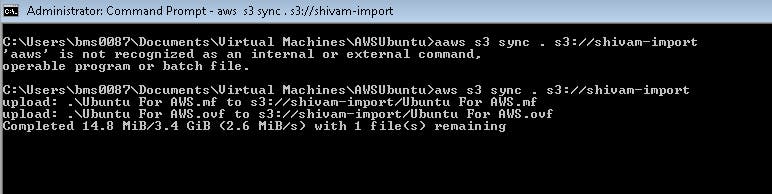
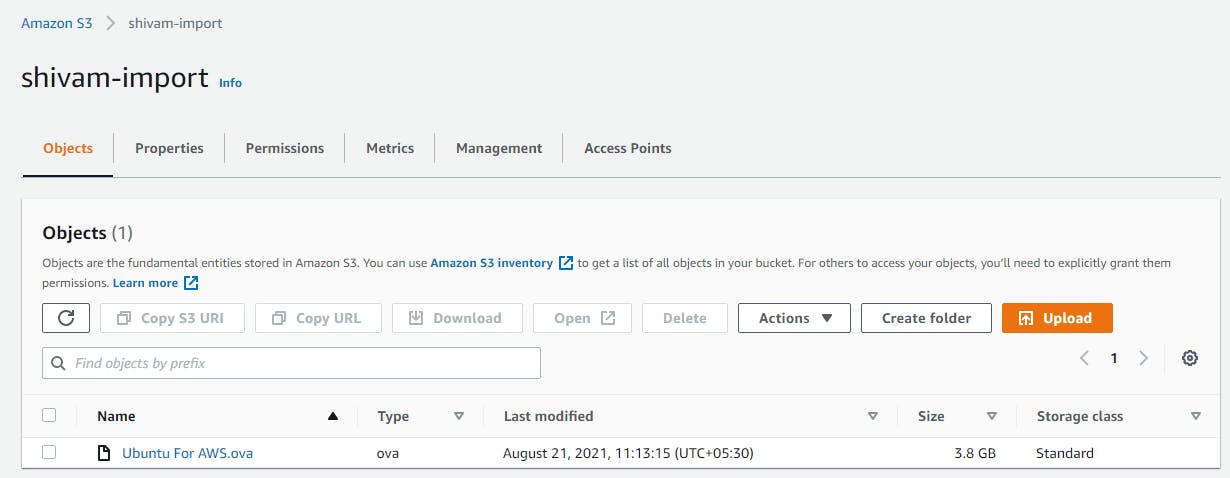
- Ensure the .OVA file is available in S3 Bucket.
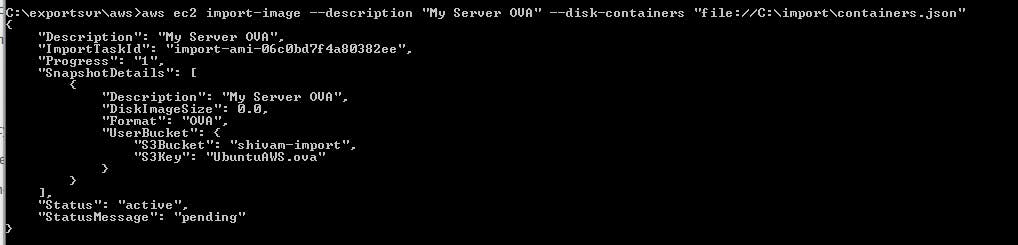
Create Continer.json File
- Create the container.json file with the below values. AWS Import task will import your ova file and convert as AMI.
container.json
 [
  {
    "Description": "My Server OVA",
    "Format": "ova",
    "UserBucket": {
        "S3Bucket": "shivam-import",
        "S3Key": "Ubuntu For AWS.ova"
    }
  }
]
- Lets Start the Import Task
- Use the following command to import an image with a single disk.
aws ec2 import-image --description "My server VM" --disk-containers "file://C:\import\containers.json"
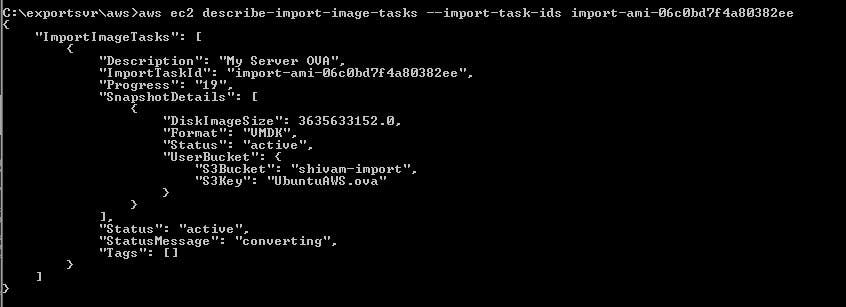
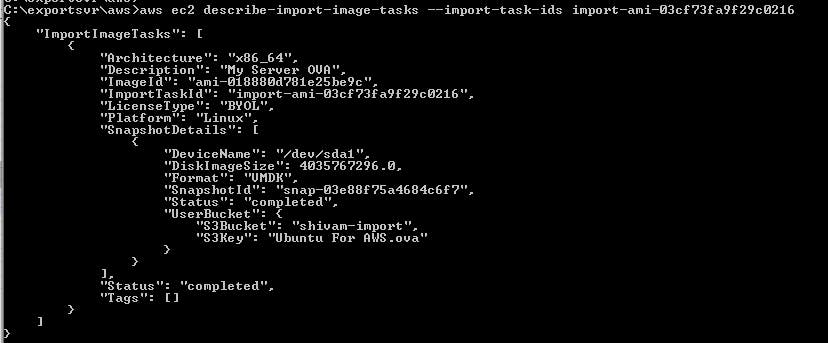
- To Monitor an import image task
- Use the describe-import-image-tasks command to return the status of an import task.
- To know the status of the import task get teh import task id and add this to the below command.
aws ec2 describe-import-image-tasks --import-task-ids import-ami-1234567890abcdef0
- Task started and shows the converting process and active state.
- The Task Completed now.
- That's all... all the On-prem side and command line tasks completed now.
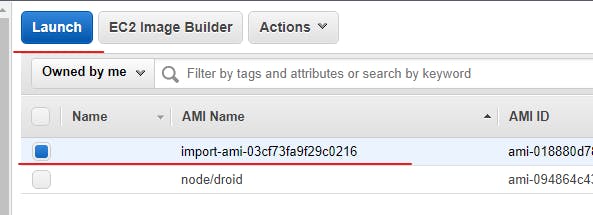
- Launch the Server with Imported Image.
- Now we want to check The Imported VM IN AWS EC2 Ami console.

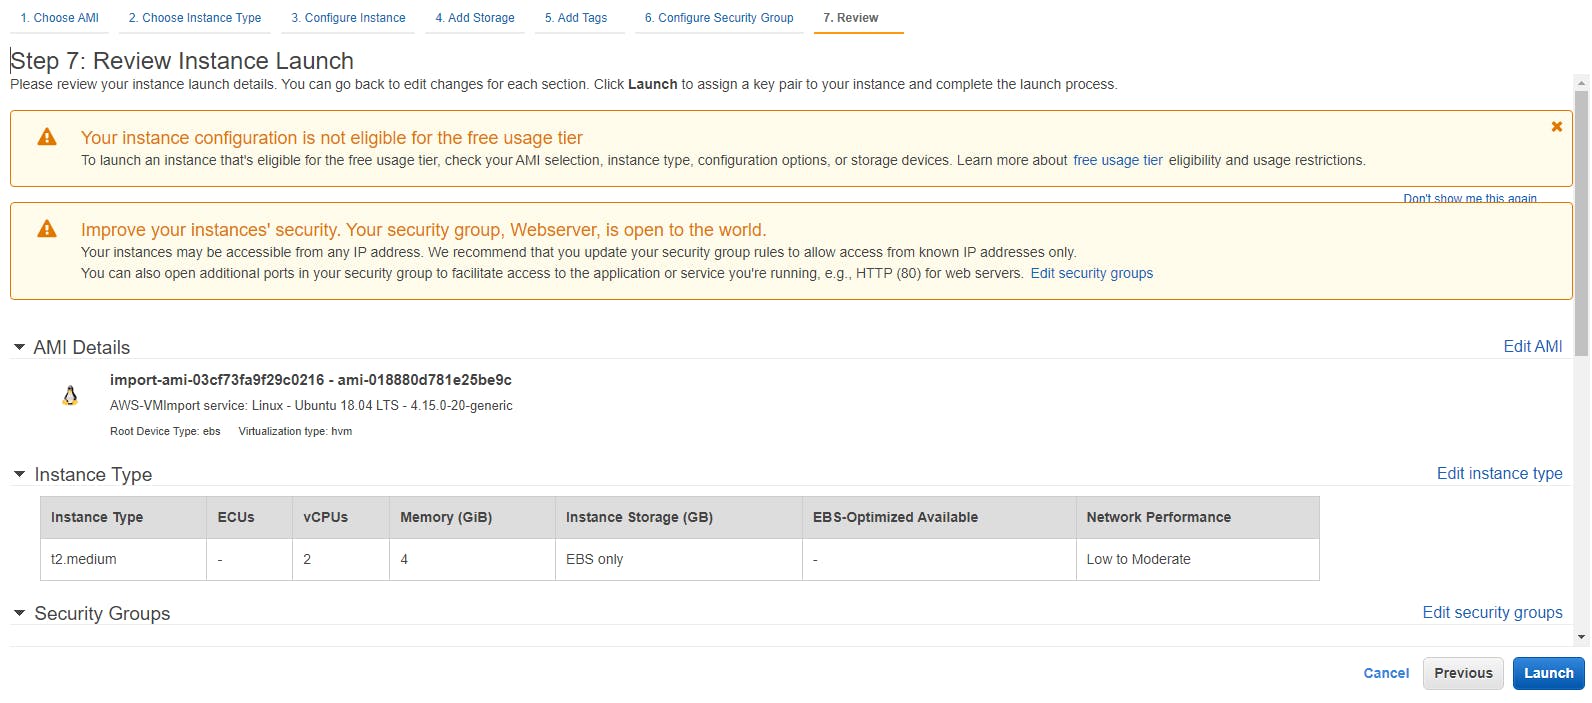
- Just Launch the instance from AMI with default EC2 Launch configurations.
- Ensure in your security group ssh and http ports are opened.
- Connect it Via SSH.
Its not taking your pem key file for auth.its only access by users that are alredy in your on-prem server.


- Now we can logged in via ssh.

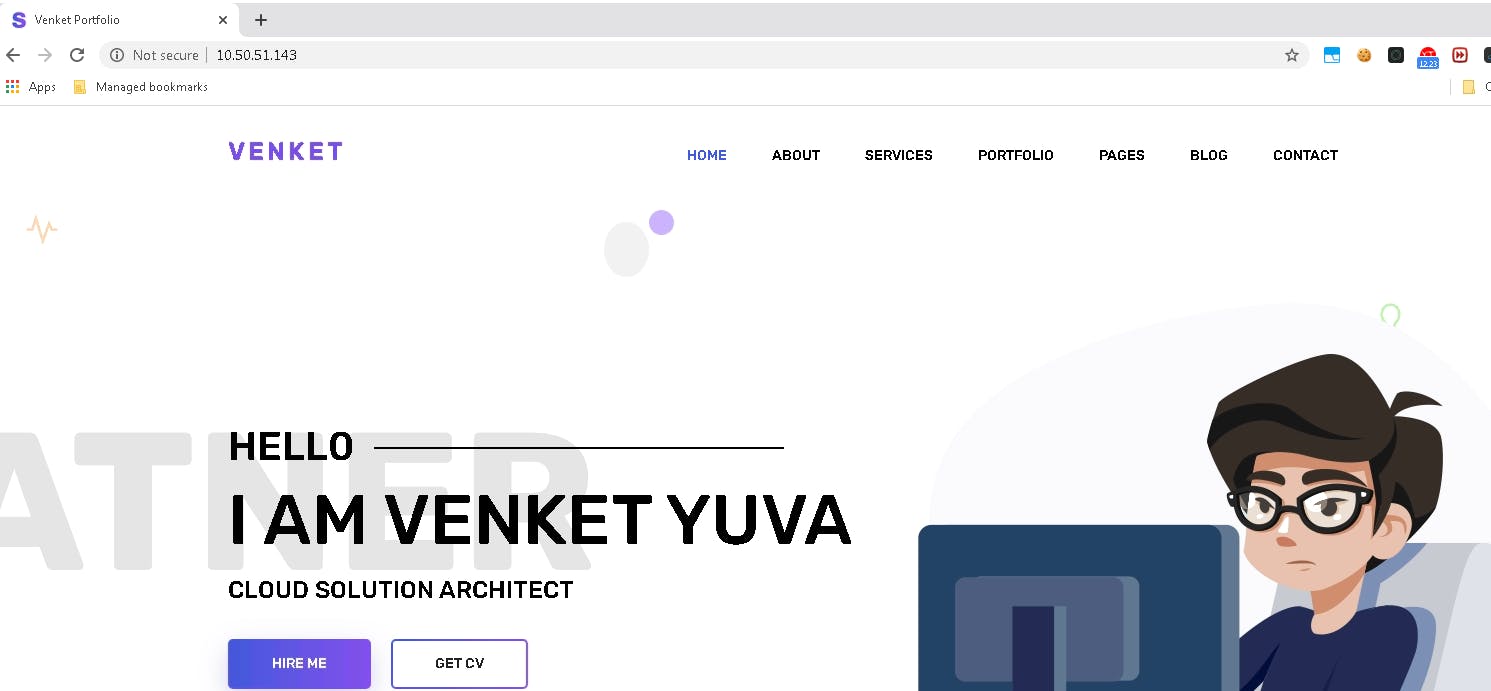
- Now you just check the servers public ip in browser.
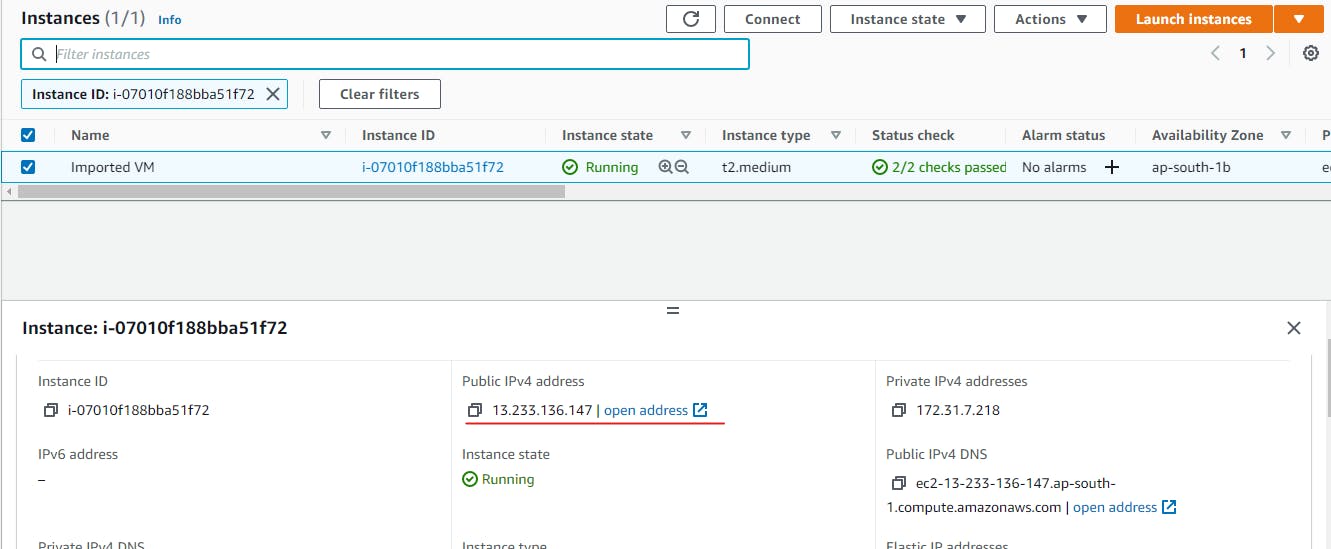
Yeah Its working perfectly.