Install and configure Kubernetes Master and Worker node
Create Simple Kubernetes Cluster and Deploy Nginx Server


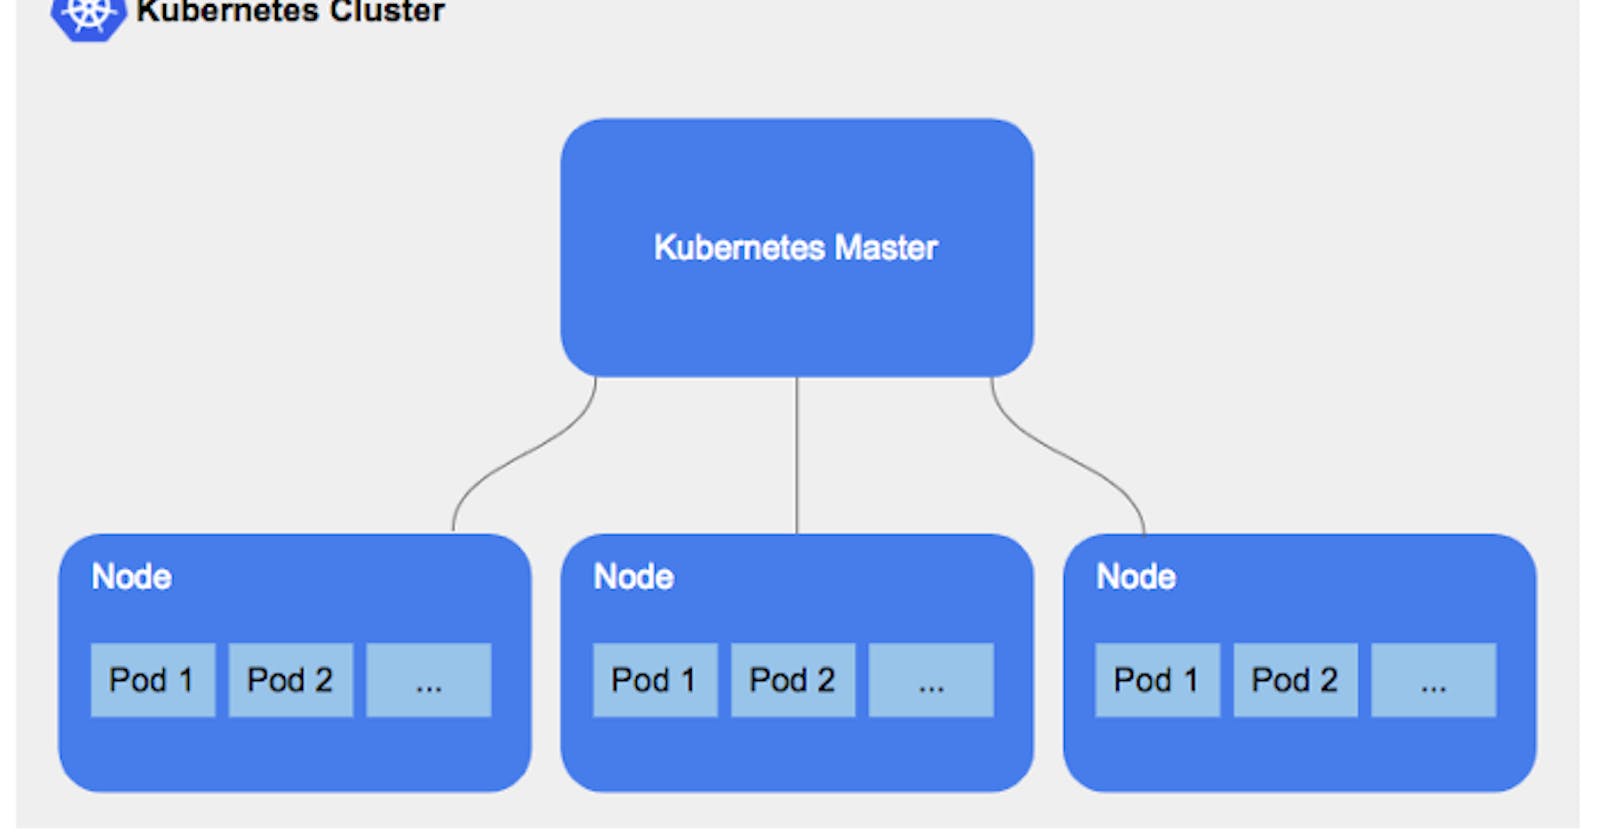
Kubernetes
Kubernetes is a portable, extensible, open-source platform for managing containerized workloads and services, that facilitates both declarative configuration and automation. It has a large, rapidly growing ecosystem. Kubernetes services, support, and tools are widely available.
Prerquesties
Master: t2.medium (2 CPUs and 2GB Memory)
Worker Nodes: t2.micro
Install Kubernetes Cluster using kubeadm
Follow this documentation to set up a Kubernetes cluster on Ubuntu 20.04 LTS.
This documentation guides you in setting up a cluster with one master node and one worker node.
Open the below ports on master on worker node
Master node: 6443 32750 10250 4443 443 8080
On Master node and Worker node: 179
On both Kmaster and Kworker
Login as root user
sudo su -
Perform all the commands as root user unless otherwise specified
Disable Firewall
ufw disable
Disable swap
swapoff -a; sed -i '/swap/d' /etc/fstab
Update sysctl settings for Kubernetes networking
cat >>/etc/sysctl.d/kubernetes.conf<<EOF
net.bridge.bridge-nf-call-ip6tables = 1
net.bridge.bridge-nf-call-iptables = 1
EOF
sysctl --system
Install docker engine
{
  apt install -y apt-transport-https ca-certificates curl gnupg-agent software-properties-common
  curl -fsSL https://download.docker.com/linux/ubuntu/gpg | apt-key add -
  add-apt-repository "deb [arch=amd64] https://download.docker.com/linux/ubuntu $(lsb_release -cs) stable"
  apt update
  apt install -y docker-ce=5:19.03.10~3-0~ubuntu-focal containerd.io
}
Kubernetes Setup
Add Apt repository
{
  curl -s https://packages.cloud.google.com/apt/doc/apt-key.gpg | apt-key add -
  echo "deb https://apt.kubernetes.io/ kubernetes-xenial main" > /etc/apt/sources.list.d/kubernetes.list
}
Install Kubernetes components
apt update && apt install -y kubeadm=1.18.5-00 kubelet=1.18.5-00 kubectl=1.18.5-00
In case you are using LXC containers for Kubernetes nodes Hack required to provision K8s v1.15+ in LXC containers
{
  mknod /dev/kmsg c 1 11
  echo '#!/bin/sh -e' >> /etc/rc.local
  echo 'mknod /dev/kmsg c 1 11' >> /etc/rc.local
  chmod +x /etc/rc.local
}
On kmaster
Initialize Kubernetes Cluster
Update the below command with the ip address of kmaster
kubeadm init --apiserver-advertise-address=172.16.16.100 --pod-network-cidr=192.168.0.0/16 --ignore-preflight-errors=all
Deploy Calico network
kubectl --kubeconfig=/etc/kubernetes/admin.conf create -f https://docs.projectcalico.org/v3.14/manifests/calico.yaml
Cluster join command
kubeadm token create --print-join-command
To be able to run kubectl commands as non-root user If you want to be able to run kubectl commands as non-root user, then as a non-root user perform these
mkdir -p $HOME/.kube
sudo cp -i /etc/kubernetes/admin.conf $HOME/.kube/config
sudo chown $(id -u):$(id -g) $HOME/.kube/config
On Kworker
Join the cluster
Use the output from kubeadm token create command in previous step from the master server and run here.
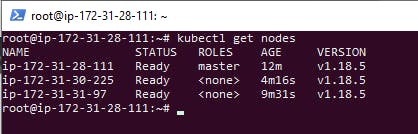
Verifying the cluster (On kmaster)
Get Nodes status
kubectl get nodes
Get component status
kubectl get cs
TO Deploy Nginx on cluster
kubectl create deploy nginx --image nginx
On K Master
kubectl get nodes
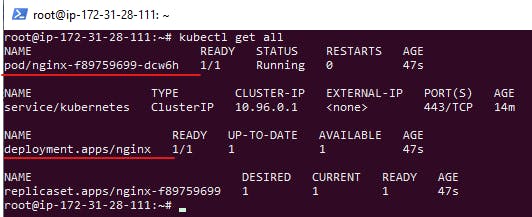
Ok Now We will going to Deploy Nginx Image for testing Purpose.
kubectl create deploy nginx --image nginx

To Get All the Deployment and pods details execute the commands.
kubectl get all
To Expose the Nginx port
kubectl expose deploy nginx --port 80 --type NodePort

To Check Execute the get svc command
kubectl get svc

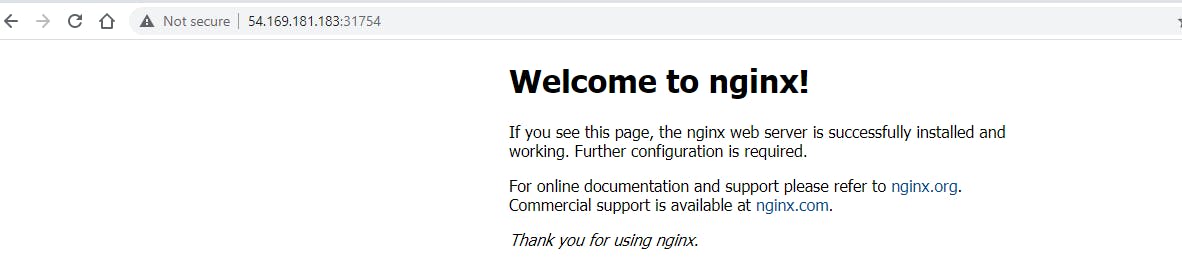
Now check the Node public IP in Browser
Thats All Guys...